> ## Documentation Index
> Fetch the complete documentation index at: https://docs-staging-chore-events-autoupdate.mintlify.site/llms.txt
> Use this file to discover all available pages before exploring further.

> Découvrez comment configurer des étapes d’inscription supplémentaires à l’aide de Forms for Actions

# Cas d’utilisation : Configurer des étapes d’inscription supplémentaires à l’aide de Forms

<Card title="Avant de commencer">
  1. Créez une [Machine-to-Machine Application](/docs/fr-ca/get-started/auth0-overview/create-applications/machine-to-machine-apps) avec les scopes suivants activés :

  * `read:users`
  * `update:users`
  * `create:users`
  * `read:users_app_metadata`
  * `update:users_app_metadata`
  * `create:users_app_metadata`

  2. Ajoutez une [connexion Vault](/docs/fr-ca/customize/forms/vault) à l’aide des informations d’identification de l’application M2M.
</Card>

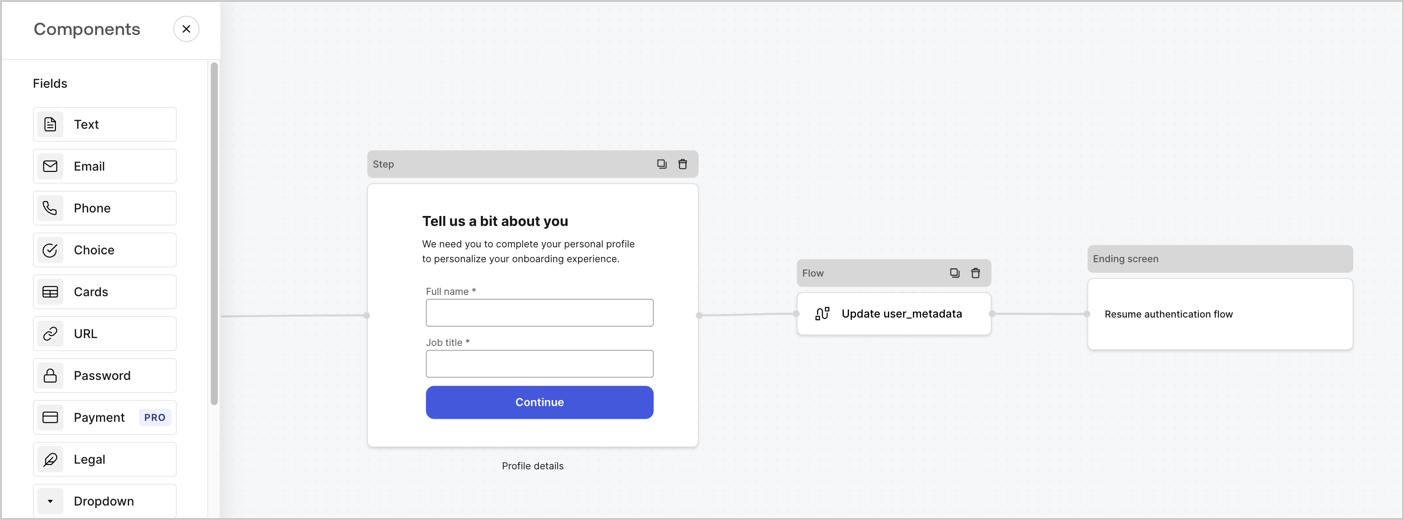
Forms for Actions vous permet d’ajouter des étapes supplémentaires à vos flux d’inscription ou de login, et de les rendre obligatoires avant que les utilisateurs puissent accéder à votre application.
<Frame>
  <img src="https://mintcdn.com/docs-staging-chore-events-autoupdate/-03jFzhFIcGXXIG2/docs/images/cdy7uua7fh8z/ZOQNi6SrEC9OREcBbdiJ3/d79f84fb61acd5473bdf932527e26d58/custom-signup-form.png?fit=max&auto=format&n=-03jFzhFIcGXXIG2&q=85&s=73b20d8477509e7b1c76859d6b8abf28" alt="Dashboard > Actions > Forms > Cas d’utilisation Formulaire d’inscription personnalisé" data-og-width="1404" width="1404" data-og-height="520" height="520" data-path="docs/images/cdy7uua7fh8z/ZOQNi6SrEC9OREcBbdiJ3/d79f84fb61acd5473bdf932527e26d58/custom-signup-form.png" data-optimize="true" data-opv="3" srcset="https://mintcdn.com/docs-staging-chore-events-autoupdate/-03jFzhFIcGXXIG2/docs/images/cdy7uua7fh8z/ZOQNi6SrEC9OREcBbdiJ3/d79f84fb61acd5473bdf932527e26d58/custom-signup-form.png?w=280&fit=max&auto=format&n=-03jFzhFIcGXXIG2&q=85&s=fadb0531cdbe3e125b9b380a96a87edc 280w, https://mintcdn.com/docs-staging-chore-events-autoupdate/-03jFzhFIcGXXIG2/docs/images/cdy7uua7fh8z/ZOQNi6SrEC9OREcBbdiJ3/d79f84fb61acd5473bdf932527e26d58/custom-signup-form.png?w=560&fit=max&auto=format&n=-03jFzhFIcGXXIG2&q=85&s=ae0dc6e8c69b917acedb31b4630b3237 560w, https://mintcdn.com/docs-staging-chore-events-autoupdate/-03jFzhFIcGXXIG2/docs/images/cdy7uua7fh8z/ZOQNi6SrEC9OREcBbdiJ3/d79f84fb61acd5473bdf932527e26d58/custom-signup-form.png?w=840&fit=max&auto=format&n=-03jFzhFIcGXXIG2&q=85&s=db5c51282644bfea42469cbaaac7a6d6 840w, https://mintcdn.com/docs-staging-chore-events-autoupdate/-03jFzhFIcGXXIG2/docs/images/cdy7uua7fh8z/ZOQNi6SrEC9OREcBbdiJ3/d79f84fb61acd5473bdf932527e26d58/custom-signup-form.png?w=1100&fit=max&auto=format&n=-03jFzhFIcGXXIG2&q=85&s=4978b3eee6b76d64a2a68a72facc740d 1100w, https://mintcdn.com/docs-staging-chore-events-autoupdate/-03jFzhFIcGXXIG2/docs/images/cdy7uua7fh8z/ZOQNi6SrEC9OREcBbdiJ3/d79f84fb61acd5473bdf932527e26d58/custom-signup-form.png?w=1650&fit=max&auto=format&n=-03jFzhFIcGXXIG2&q=85&s=3a58b9c60313f0e9cc9787056d698be9 1650w, https://mintcdn.com/docs-staging-chore-events-autoupdate/-03jFzhFIcGXXIG2/docs/images/cdy7uua7fh8z/ZOQNi6SrEC9OREcBbdiJ3/d79f84fb61acd5473bdf932527e26d58/custom-signup-form.png?w=2500&fit=max&auto=format&n=-03jFzhFIcGXXIG2&q=85&s=90283c5258c7cdf6002e622a3d771019 2500w" />
</Frame>

Les sections ci-dessous expliquent comment créer des formulaires pour ajouter des étapes d’inscription supplémentaires à l’aide de nœuds et de flux, ainsi que la marche à suivre pour ajouter votre formulaire à une Action [Post Login](/docs/fr-ca/customize/actions/explore-triggers/signup-and-login-triggers/login-trigger).

<h2 id="create-a-form-from-scratch">
  Créer un formulaire à partir de zéro
</h2>

Suivez ces étapes pour créer un formulaire afin de recueillir des renseignements :

1. Ouvrez l’éditeur de formulaires en sélectionnant **Auth0 Dashboard > Actions > Forms.**
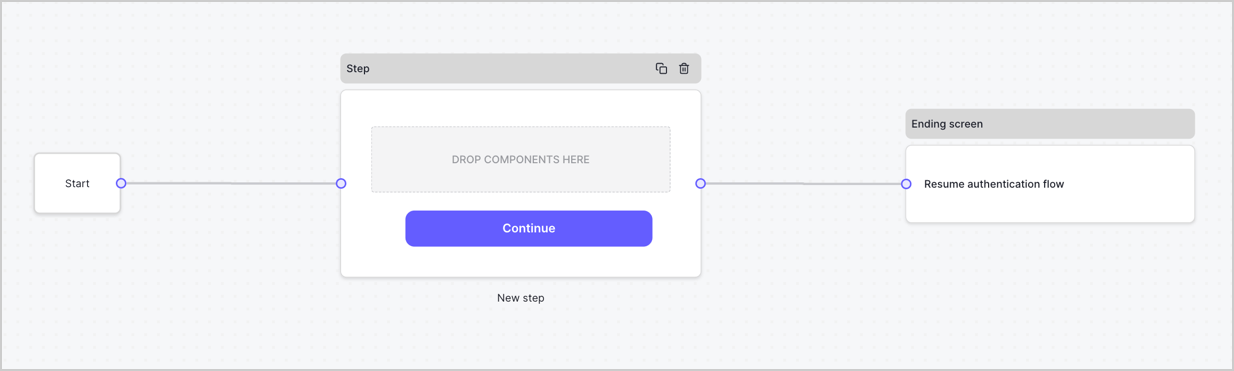
2. Sélectionnez **Create Form** > **Start from scratch**.

Par défaut, un nouveau formulaire contient un nœud Start, un nœud Step et un nœud Ending screen.
<Frame>
  <img src="https://mintcdn.com/docs-staging-chore-events-autoupdate/pcHJQgtevaBQ-IbW/docs/images/cdy7uua7fh8z/2TZ9jSjgEcARFpULI6hz4R/a4319a1bd482f2ee5cc23100fdb2f42c/New-form-Forms-for-action-use-case.png?fit=max&auto=format&n=pcHJQgtevaBQ-IbW&q=85&s=bd8664d5a8f3adb9ba9e9521277b9f80" alt="Dashboard > Forms > Cas d’utilisation > Form" data-og-width="1234" width="1234" data-og-height="371" height="371" data-path="docs/images/cdy7uua7fh8z/2TZ9jSjgEcARFpULI6hz4R/a4319a1bd482f2ee5cc23100fdb2f42c/New-form-Forms-for-action-use-case.png" data-optimize="true" data-opv="3" srcset="https://mintcdn.com/docs-staging-chore-events-autoupdate/pcHJQgtevaBQ-IbW/docs/images/cdy7uua7fh8z/2TZ9jSjgEcARFpULI6hz4R/a4319a1bd482f2ee5cc23100fdb2f42c/New-form-Forms-for-action-use-case.png?w=280&fit=max&auto=format&n=pcHJQgtevaBQ-IbW&q=85&s=1f67f1665ad460b78d69554dc09707a5 280w, https://mintcdn.com/docs-staging-chore-events-autoupdate/pcHJQgtevaBQ-IbW/docs/images/cdy7uua7fh8z/2TZ9jSjgEcARFpULI6hz4R/a4319a1bd482f2ee5cc23100fdb2f42c/New-form-Forms-for-action-use-case.png?w=560&fit=max&auto=format&n=pcHJQgtevaBQ-IbW&q=85&s=4e8b0a823a5f0fe57d8748ad22978ebe 560w, https://mintcdn.com/docs-staging-chore-events-autoupdate/pcHJQgtevaBQ-IbW/docs/images/cdy7uua7fh8z/2TZ9jSjgEcARFpULI6hz4R/a4319a1bd482f2ee5cc23100fdb2f42c/New-form-Forms-for-action-use-case.png?w=840&fit=max&auto=format&n=pcHJQgtevaBQ-IbW&q=85&s=42429091e06a2e8644efd4d7935db466 840w, https://mintcdn.com/docs-staging-chore-events-autoupdate/pcHJQgtevaBQ-IbW/docs/images/cdy7uua7fh8z/2TZ9jSjgEcARFpULI6hz4R/a4319a1bd482f2ee5cc23100fdb2f42c/New-form-Forms-for-action-use-case.png?w=1100&fit=max&auto=format&n=pcHJQgtevaBQ-IbW&q=85&s=b0480b23d7ca03bfaf71dc70c591c400 1100w, https://mintcdn.com/docs-staging-chore-events-autoupdate/pcHJQgtevaBQ-IbW/docs/images/cdy7uua7fh8z/2TZ9jSjgEcARFpULI6hz4R/a4319a1bd482f2ee5cc23100fdb2f42c/New-form-Forms-for-action-use-case.png?w=1650&fit=max&auto=format&n=pcHJQgtevaBQ-IbW&q=85&s=0bdeb7d60588f07348c50371749cee67 1650w, https://mintcdn.com/docs-staging-chore-events-autoupdate/pcHJQgtevaBQ-IbW/docs/images/cdy7uua7fh8z/2TZ9jSjgEcARFpULI6hz4R/a4319a1bd482f2ee5cc23100fdb2f42c/New-form-Forms-for-action-use-case.png?w=2500&fit=max&auto=format&n=pcHJQgtevaBQ-IbW&q=85&s=dc02272d7692f30582e3b169bfe165b4 2500w" />
</Frame>

<h3 id="configure-the-step-node">
  Configurer le nœud Step
</h3>

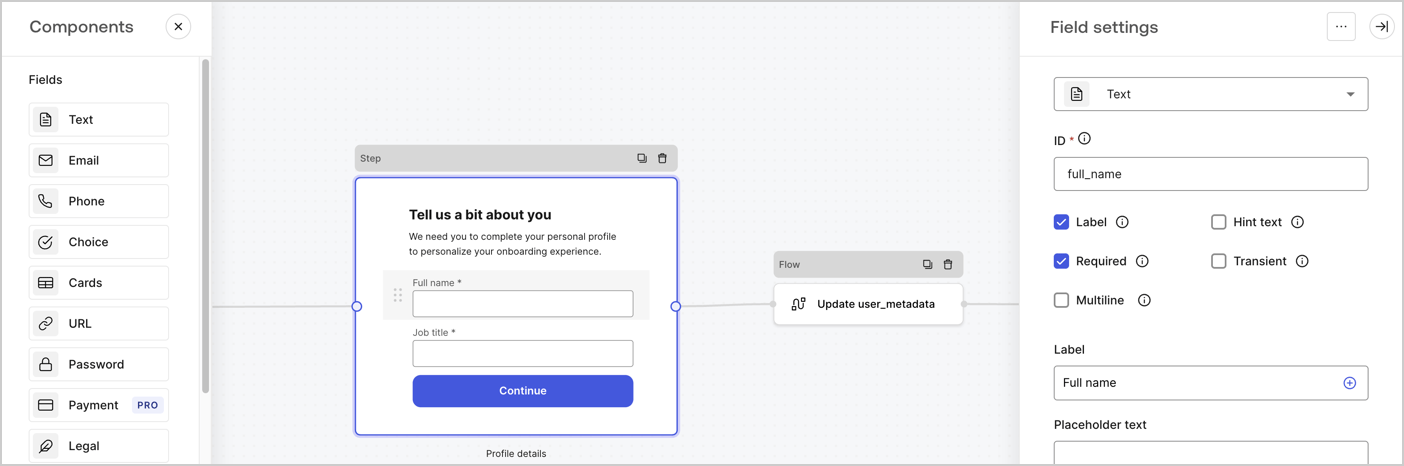
Le nœud Step est l’interface graphique visible par les utilisateurs. Ajoutez des [champs](/docs/fr-ca/customize/forms/nodes-and-components) au nœud Step pour recueillir le nom complet et le titre du poste de l’utilisateur en suivant ces étapes :

1. Faites glisser un champ **Texte enrichi** du **menu Components** vers le nœud **Step**.

   * **Texte enrichi** : Saisissez un message personnalisé.
   * Sélectionnez **Enregistrer**.
2. Faites glisser un champ **Texte** vers le nœud **Step**.

   * **ID** : Saisissez `full_name`.
   * **Étiquette** : Saisissez `Full name`.
   * **Étiquette** : Cochez la case.
   * **Obligatoire** : Cochez la case.
   * Sélectionnez **Enregistrer**.
3. Faites glisser un champ **Texte** vers le nœud **Step**.

   * **ID** : Saisissez `job_title`.
   * **Étiquette** : Saisissez `Job title.`
   * **Étiquette** : Cochez la case.
   * **Obligatoire** : Cochez la case.
   * Sélectionnez **Enregistrer**.
4. Sélectionnez **Publier** pour enregistrer.
<Frame>
  <img src="https://mintcdn.com/docs-staging-chore-events-autoupdate/98W2_Y-L23YJndAZ/docs/images/cdy7uua7fh8z/6Kcn0ai9fsVsqHwZpTGByG/37cbf4ffee63a7010926b15f06dd20ac/custom-signup-step-node.png?fit=max&auto=format&n=98W2_Y-L23YJndAZ&q=85&s=f20a840f9d5c55beb0cd63d88d0a499d" alt="Dashboard > Actions > Forms > cas d’utilisation Custom Signup étapes nœud Step" data-og-width="1404" width="1404" data-og-height="466" height="466" data-path="docs/images/cdy7uua7fh8z/6Kcn0ai9fsVsqHwZpTGByG/37cbf4ffee63a7010926b15f06dd20ac/custom-signup-step-node.png" data-optimize="true" data-opv="3" srcset="https://mintcdn.com/docs-staging-chore-events-autoupdate/98W2_Y-L23YJndAZ/docs/images/cdy7uua7fh8z/6Kcn0ai9fsVsqHwZpTGByG/37cbf4ffee63a7010926b15f06dd20ac/custom-signup-step-node.png?w=280&fit=max&auto=format&n=98W2_Y-L23YJndAZ&q=85&s=bc5186897ebc2e005e0aa334f439ca56 280w, https://mintcdn.com/docs-staging-chore-events-autoupdate/98W2_Y-L23YJndAZ/docs/images/cdy7uua7fh8z/6Kcn0ai9fsVsqHwZpTGByG/37cbf4ffee63a7010926b15f06dd20ac/custom-signup-step-node.png?w=560&fit=max&auto=format&n=98W2_Y-L23YJndAZ&q=85&s=373e86a16a5d7aea34d6b8f793956f01 560w, https://mintcdn.com/docs-staging-chore-events-autoupdate/98W2_Y-L23YJndAZ/docs/images/cdy7uua7fh8z/6Kcn0ai9fsVsqHwZpTGByG/37cbf4ffee63a7010926b15f06dd20ac/custom-signup-step-node.png?w=840&fit=max&auto=format&n=98W2_Y-L23YJndAZ&q=85&s=090b1266d6ef3a1322c5ffd91a3989c3 840w, https://mintcdn.com/docs-staging-chore-events-autoupdate/98W2_Y-L23YJndAZ/docs/images/cdy7uua7fh8z/6Kcn0ai9fsVsqHwZpTGByG/37cbf4ffee63a7010926b15f06dd20ac/custom-signup-step-node.png?w=1100&fit=max&auto=format&n=98W2_Y-L23YJndAZ&q=85&s=6ca91bbd329d3d1c3a088c4f4ebfe9ac 1100w, https://mintcdn.com/docs-staging-chore-events-autoupdate/98W2_Y-L23YJndAZ/docs/images/cdy7uua7fh8z/6Kcn0ai9fsVsqHwZpTGByG/37cbf4ffee63a7010926b15f06dd20ac/custom-signup-step-node.png?w=1650&fit=max&auto=format&n=98W2_Y-L23YJndAZ&q=85&s=6574d1126ab59979932a27db275025da 1650w, https://mintcdn.com/docs-staging-chore-events-autoupdate/98W2_Y-L23YJndAZ/docs/images/cdy7uua7fh8z/6Kcn0ai9fsVsqHwZpTGByG/37cbf4ffee63a7010926b15f06dd20ac/custom-signup-step-node.png?w=2500&fit=max&auto=format&n=98W2_Y-L23YJndAZ&q=85&s=82829ab580c75c80ed4135fbf803f423 2500w" />
</Frame>

<h3 id="configure-the-flow-node">
  Configurer le nœud Flow
</h3>

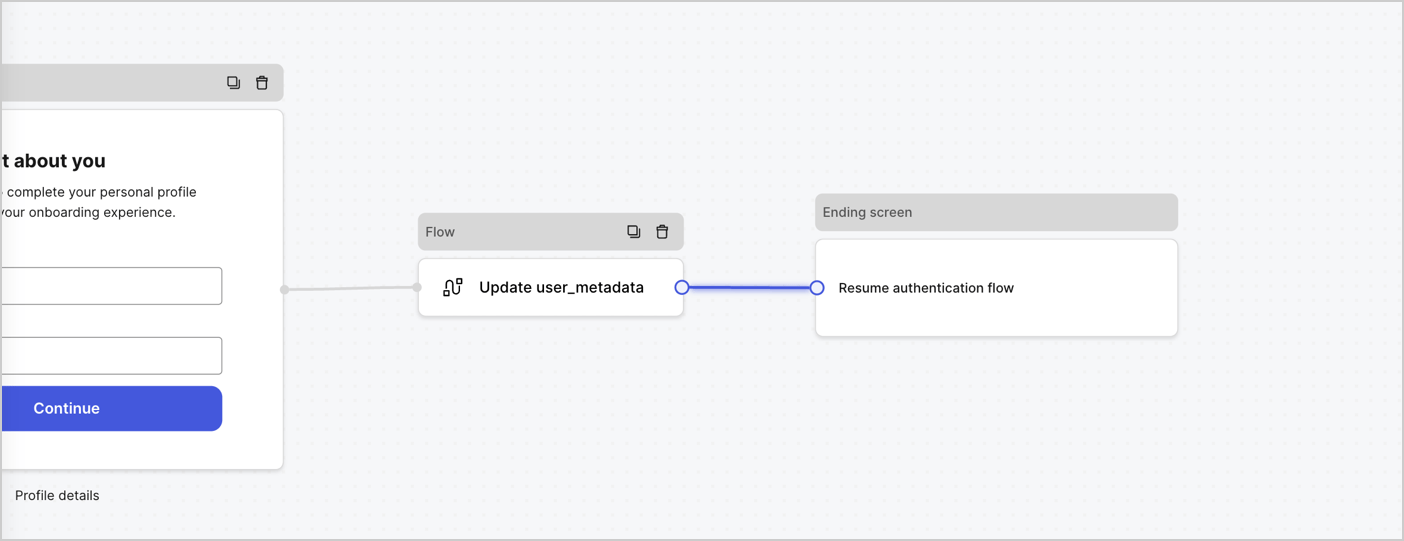
Ajoutez un nœud **Flow** après le nœud **Step** pour mettre à jour `user_metadata` et reprendre le flux d’authentification en suivant ces étapes :

1. Sélectionnez **Flow** au bas de l’éditeur de formulaires.
2. Supprimez le lien existant entre les nœuds **Step** et **Ending Screen**.
3. Sélectionnez le nouveau **Flow** > **Click to add a flow** > **Create a new flow.**

   * Entrez `Update user_metadata` dans le champ **Name**.
   * Sélectionnez **Create**.
   * Sélectionnez **Save**.
4. Liez le nœud **Flow** aux nœuds **Step** et **Ending Screen**, comme illustré ci-dessous.
5. Sélectionnez **Publish** pour enregistrer.
<Frame>
  <img src="https://mintcdn.com/docs-staging-chore-events-autoupdate/12G97kMYRYfQpTHS/docs/images/cdy7uua7fh8z/4nTdYdA2Hu5vK65smkdvJg/db3294ebc25a7c2636be96362a3ea56e/custom-signup-step-flow.png?fit=max&auto=format&n=12G97kMYRYfQpTHS&q=85&s=6f0d0ba68382543251331459180272ac" alt="Dashboard > Actions > Forms > Cas d’usage Custom Signup Step Update User metadata flow" data-og-width="1404" width="1404" data-og-height="541" height="541" data-path="docs/images/cdy7uua7fh8z/4nTdYdA2Hu5vK65smkdvJg/db3294ebc25a7c2636be96362a3ea56e/custom-signup-step-flow.png" data-optimize="true" data-opv="3" srcset="https://mintcdn.com/docs-staging-chore-events-autoupdate/12G97kMYRYfQpTHS/docs/images/cdy7uua7fh8z/4nTdYdA2Hu5vK65smkdvJg/db3294ebc25a7c2636be96362a3ea56e/custom-signup-step-flow.png?w=280&fit=max&auto=format&n=12G97kMYRYfQpTHS&q=85&s=89fe0bdfc721cfc4e1096449c35e2813 280w, https://mintcdn.com/docs-staging-chore-events-autoupdate/12G97kMYRYfQpTHS/docs/images/cdy7uua7fh8z/4nTdYdA2Hu5vK65smkdvJg/db3294ebc25a7c2636be96362a3ea56e/custom-signup-step-flow.png?w=560&fit=max&auto=format&n=12G97kMYRYfQpTHS&q=85&s=7e19141e4891612e4e559716c2162e60 560w, https://mintcdn.com/docs-staging-chore-events-autoupdate/12G97kMYRYfQpTHS/docs/images/cdy7uua7fh8z/4nTdYdA2Hu5vK65smkdvJg/db3294ebc25a7c2636be96362a3ea56e/custom-signup-step-flow.png?w=840&fit=max&auto=format&n=12G97kMYRYfQpTHS&q=85&s=8d35b11ae09319d77094bb2b3a31a8dd 840w, https://mintcdn.com/docs-staging-chore-events-autoupdate/12G97kMYRYfQpTHS/docs/images/cdy7uua7fh8z/4nTdYdA2Hu5vK65smkdvJg/db3294ebc25a7c2636be96362a3ea56e/custom-signup-step-flow.png?w=1100&fit=max&auto=format&n=12G97kMYRYfQpTHS&q=85&s=18b2f516f8c2a3fc14f46a599310a68d 1100w, https://mintcdn.com/docs-staging-chore-events-autoupdate/12G97kMYRYfQpTHS/docs/images/cdy7uua7fh8z/4nTdYdA2Hu5vK65smkdvJg/db3294ebc25a7c2636be96362a3ea56e/custom-signup-step-flow.png?w=1650&fit=max&auto=format&n=12G97kMYRYfQpTHS&q=85&s=f1c6fbf2c47eafc3baf2cea1495ef2d9 1650w, https://mintcdn.com/docs-staging-chore-events-autoupdate/12G97kMYRYfQpTHS/docs/images/cdy7uua7fh8z/4nTdYdA2Hu5vK65smkdvJg/db3294ebc25a7c2636be96362a3ea56e/custom-signup-step-flow.png?w=2500&fit=max&auto=format&n=12G97kMYRYfQpTHS&q=85&s=0cd2a7b8d804e9f9ec1ed0149d3e25c1 2500w" />
</Frame>

Ajoutez une action Auth0 **Update user** au flux en suivant ces étapes :

1. Sélectionnez le **Flow** **Update user\_metadata** > **Edit flow** pour ouvrir l’éditeur de flux dans un nouvel onglet.
2. Sous StartAction, sélectionnez l’icône **+** pour ajouter une Action **Update user**. Remplissez les champs ci-dessous, puis sélectionnez **Save** pour continuer.

   * **Connection** : Dans la liste déroulante, sélectionnez la connexion Vault vers votre application M2M.

   * **User ID** : Entrez `{{context.user.user_id}}`.

   * **Body** : Copiez-collez le code suivant pour mettre à jour `user_metadata` avec les propriétés `full_name` et `job_title`.

     ```json lines theme={null}
     {
       "user_metadata": {
         "full_name": "{{fields.full_name}}",
         "job_title": "{{fields.job_title}}"
       }
     }
     ```

   * Sélectionnez **Save**.
3. Sélectionnez Publish pour enregistrer.

<h2 id="retrieve-your-form-render-code">
  Récupérez le code de rendu de votre formulaire
</h2>

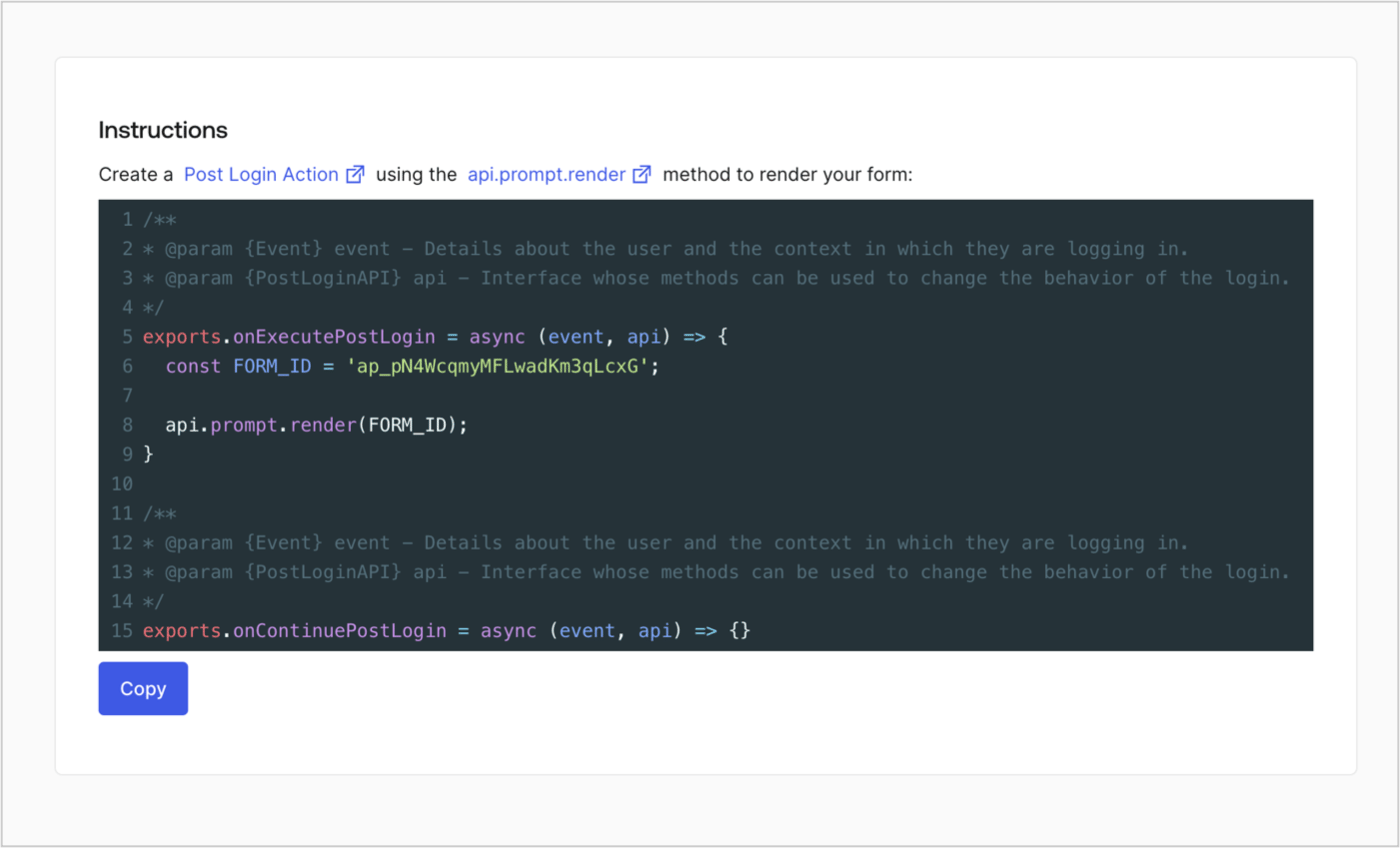
Récupérez le code de rendu de votre formulaire pour afficher le formulaire visuellement à l’aide d’une Action Post Login personnalisée en suivant ces étapes :

* Dans l’éditeur de formulaires, sélectionnez **`<> Render`**.
* Sélectionnez **Copy**.
<Frame>
  <img src="https://mintcdn.com/docs-staging-chore-events-autoupdate/ofS79UqxQk3qmkew/docs/images/cdy7uua7fh8z/2EIUzc539sq9lwoTKbjoJv/496a864c0fc44a782c9cadca119dbfb0/embed.png?fit=max&auto=format&n=ofS79UqxQk3qmkew&q=85&s=9fd0679dec5921abac0e90f621e15faf" alt="Dashboard > Actions > Forms > Form > Embed" data-og-width="1400" width="1400" data-og-height="848" height="848" data-path="docs/images/cdy7uua7fh8z/2EIUzc539sq9lwoTKbjoJv/496a864c0fc44a782c9cadca119dbfb0/embed.png" data-optimize="true" data-opv="3" srcset="https://mintcdn.com/docs-staging-chore-events-autoupdate/ofS79UqxQk3qmkew/docs/images/cdy7uua7fh8z/2EIUzc539sq9lwoTKbjoJv/496a864c0fc44a782c9cadca119dbfb0/embed.png?w=280&fit=max&auto=format&n=ofS79UqxQk3qmkew&q=85&s=5bf75940cd97d5aa00c15e6ff0730584 280w, https://mintcdn.com/docs-staging-chore-events-autoupdate/ofS79UqxQk3qmkew/docs/images/cdy7uua7fh8z/2EIUzc539sq9lwoTKbjoJv/496a864c0fc44a782c9cadca119dbfb0/embed.png?w=560&fit=max&auto=format&n=ofS79UqxQk3qmkew&q=85&s=8f296fc938f8170e772f26f7ba52e086 560w, https://mintcdn.com/docs-staging-chore-events-autoupdate/ofS79UqxQk3qmkew/docs/images/cdy7uua7fh8z/2EIUzc539sq9lwoTKbjoJv/496a864c0fc44a782c9cadca119dbfb0/embed.png?w=840&fit=max&auto=format&n=ofS79UqxQk3qmkew&q=85&s=60e3398905191e456e8b8841f822ce4d 840w, https://mintcdn.com/docs-staging-chore-events-autoupdate/ofS79UqxQk3qmkew/docs/images/cdy7uua7fh8z/2EIUzc539sq9lwoTKbjoJv/496a864c0fc44a782c9cadca119dbfb0/embed.png?w=1100&fit=max&auto=format&n=ofS79UqxQk3qmkew&q=85&s=9c207a2345bdfdcecc98c99c701ea2ff 1100w, https://mintcdn.com/docs-staging-chore-events-autoupdate/ofS79UqxQk3qmkew/docs/images/cdy7uua7fh8z/2EIUzc539sq9lwoTKbjoJv/496a864c0fc44a782c9cadca119dbfb0/embed.png?w=1650&fit=max&auto=format&n=ofS79UqxQk3qmkew&q=85&s=209b65b5c965e6628dfd74de9a1e9b7d 1650w, https://mintcdn.com/docs-staging-chore-events-autoupdate/ofS79UqxQk3qmkew/docs/images/cdy7uua7fh8z/2EIUzc539sq9lwoTKbjoJv/496a864c0fc44a782c9cadca119dbfb0/embed.png?w=2500&fit=max&auto=format&n=ofS79UqxQk3qmkew&q=85&s=021604a2a7eecc4d8e4f3b9f1c7a3c06 2500w" />
</Frame>

<h2 id="create-a-post-login-action">
  Créer une Action Post Login
</h2>

Créez une Action post-login pour afficher votre formulaire en suivant ces étapes :

1. Accédez à **Auth0 Dashboard > Actions > Flows > Login.**
2. Sélectionnez l’icône **+**, puis **Build from scratch** :

   * **Name** : Entrez `Render Additional Signup Form`.
   * **Trigger** : Sélectionnez `Login / Post Login`.
   * **Runtime** : Sélectionnez la version recommandée.
3. Sélectionnez **Create**.

Pour configurer l’Action post-login :

1. Supprimez le code existant dans l’éditeur de code.
2. Collez le code de rendu du formulaire dans l’éditeur de code.
3. Modifiez le code pour définir la logique conditionnelle qui affichera le formulaire.

   ```javascript lines theme={null}
   /**
   * @param {Event} event - Détails sur l’utilisateur et le contexte dans lequel il se connecte.
   * @param {PostLoginAPI} api - Interface dont les méthodes peuvent être utilisées pour modifier le comportement du processus de connexion.
   */
   exports.onExecutePostLogin = async (event, api) => {
     const FORM_ID = 'REPLACE_WITH_YOUR_FORM_ID';

     if (
       !event.user.user_metadata.full_name &&
       !event.user.user_metadata.job_title
     ) {
       api.prompt.render(FORM_ID);
     }
   }

   exports.onContinuePostLogin = async (event, api) => { }
   ```

   <Callout icon="file-lines" color="#0EA5E9" iconType="regular">
     L’exemple de code ci-dessus affichera le formulaire si les propriétés `full_name` et `job_title` sont absentes des métadonnées utilisateur.
   </Callout>
4. Sélectionnez **Deploy.**
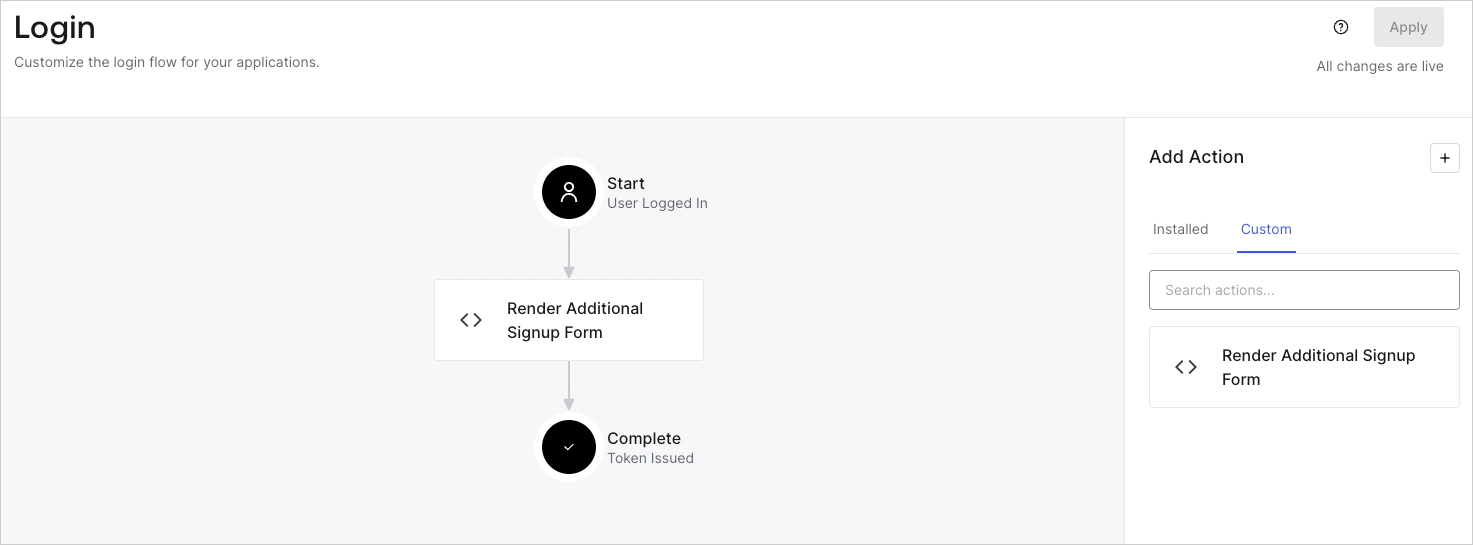
5. Glissez-déposez l’Action **Render Additional Signup Form** dans le flux **Login**.
   <Frame>
     <img src="https://mintcdn.com/docs-staging-chore-events-autoupdate/6w8esF__-Ky--zlN/docs/images/cdy7uua7fh8z/1WBOicIOcH98hKj6Lq9HF2/4951e30a0cc08c7c5daa0116eaa17e11/Screenshot_2024-03-01_at_15.48.00.png?fit=max&auto=format&n=6w8esF__-Ky--zlN&q=85&s=636ebe63aa650d2588d10d15ae782308" alt="Dashboard > Forms > Use Cases Custom Signup Steps Login Flow" data-og-width="1473" width="1473" data-og-height="545" height="545" data-path="docs/images/cdy7uua7fh8z/1WBOicIOcH98hKj6Lq9HF2/4951e30a0cc08c7c5daa0116eaa17e11/Screenshot_2024-03-01_at_15.48.00.png" data-optimize="true" data-opv="3" srcset="https://mintcdn.com/docs-staging-chore-events-autoupdate/6w8esF__-Ky--zlN/docs/images/cdy7uua7fh8z/1WBOicIOcH98hKj6Lq9HF2/4951e30a0cc08c7c5daa0116eaa17e11/Screenshot_2024-03-01_at_15.48.00.png?w=280&fit=max&auto=format&n=6w8esF__-Ky--zlN&q=85&s=b5eef368870578de270aa839cd2835d0 280w, https://mintcdn.com/docs-staging-chore-events-autoupdate/6w8esF__-Ky--zlN/docs/images/cdy7uua7fh8z/1WBOicIOcH98hKj6Lq9HF2/4951e30a0cc08c7c5daa0116eaa17e11/Screenshot_2024-03-01_at_15.48.00.png?w=560&fit=max&auto=format&n=6w8esF__-Ky--zlN&q=85&s=193cd47d797586268b959ed783339f06 560w, https://mintcdn.com/docs-staging-chore-events-autoupdate/6w8esF__-Ky--zlN/docs/images/cdy7uua7fh8z/1WBOicIOcH98hKj6Lq9HF2/4951e30a0cc08c7c5daa0116eaa17e11/Screenshot_2024-03-01_at_15.48.00.png?w=840&fit=max&auto=format&n=6w8esF__-Ky--zlN&q=85&s=9d4e6306e94cde4a0b31be75b5ca0d77 840w, https://mintcdn.com/docs-staging-chore-events-autoupdate/6w8esF__-Ky--zlN/docs/images/cdy7uua7fh8z/1WBOicIOcH98hKj6Lq9HF2/4951e30a0cc08c7c5daa0116eaa17e11/Screenshot_2024-03-01_at_15.48.00.png?w=1100&fit=max&auto=format&n=6w8esF__-Ky--zlN&q=85&s=2de857b3543c657f58083dc130e822db 1100w, https://mintcdn.com/docs-staging-chore-events-autoupdate/6w8esF__-Ky--zlN/docs/images/cdy7uua7fh8z/1WBOicIOcH98hKj6Lq9HF2/4951e30a0cc08c7c5daa0116eaa17e11/Screenshot_2024-03-01_at_15.48.00.png?w=1650&fit=max&auto=format&n=6w8esF__-Ky--zlN&q=85&s=04ae606076713c2c370bc46dac88f1bc 1650w, https://mintcdn.com/docs-staging-chore-events-autoupdate/6w8esF__-Ky--zlN/docs/images/cdy7uua7fh8z/1WBOicIOcH98hKj6Lq9HF2/4951e30a0cc08c7c5daa0116eaa17e11/Screenshot_2024-03-01_at_15.48.00.png?w=2500&fit=max&auto=format&n=6w8esF__-Ky--zlN&q=85&s=d6b2584fb2e46ce7821e63aa44f03b51 2500w" />
   </Frame>
6. Sélectionnez **Apply**.

<h3 id="test-implementation">
  Tester la mise en œuvre
</h3>

Testez la mise en œuvre en suivant ces étapes :

* Inscrivez un nouvel utilisateur à une application.
* L’Action post-login dans le flux de Login affichera le formulaire et demandera ces renseignements.
* Sélectionnez **<Tooltip tip="Auth0 Dashboard : l’interface principale d’Auth0 pour configurer vos services." cta="Voir le glossaire" href="/docs/fr-ca/glossary?term=Auth0+Dashboard">Auth0 Dashboard</Tooltip> > User Management > Users,** repérez le nouvel utilisateur et vérifiez que ses attributs `full_name` et `job_title` contiennent les renseignements saisis à l’étape d’inscription supplémentaire.
